I regularly do web development with the host localhost. Running a simple HTTP server to service my site. Recently I came across a problem where some of the newer web APIs (such as DeviceMotionEvent) do not work unless the site is served via SSL. So I went about setting up a local SSL server, and certificate.
Many of the instructions out there create a self-signed certificate, that you install to be trusted locally. I wanted my development server to be accessible from other devices on my network, and I didn’t want the hassle of installing this self-signed cert. Instead I wanted a SSL certificate that uses a real/trusted CA.
Enter Let’s Encrypt, a free service to provide SSL certificates, providing you can prove you own the domain. To go about this, I did the following on my macbook:
Install Certbot (to generate the cert)
brew install certbot
There are a few ways to prove you own a domain, the HTTP based ones require a public web server. Since my development server is only on my local network, I’m going to use a DNS based proof. Since I use Cloudflare for my DNS, I’ll be using their plugin.
pip3 install certbot-dns-cloudflare
Setup the domain (local.bramp.net)
I use cloudflare to host the DNS for my domain, so I setup a new domain, local.bramp.net, that points to an internal IP address (192.168.0.123). This domain won’t actually be used via the Internet, but will happily work for any devices on my local network.
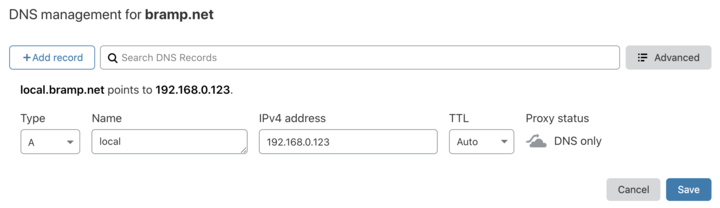
Setup DNS record for local.bramp.net
You’ll also need a API key from Cloudflare. They allow you to scope the key to only access this test domain. For example:
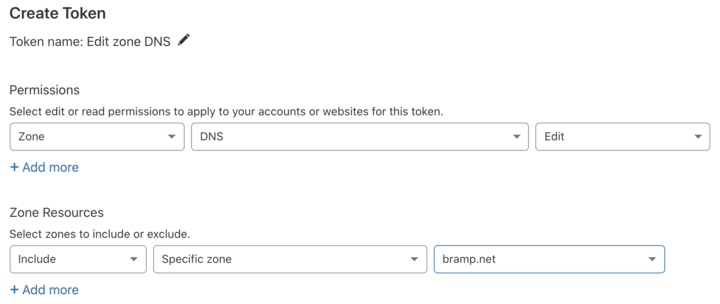
Create a API token
That will give you a token, that is a long string of letters and numbers.
Configure Certbot
# Create a place to store your secrets, that only you can access

mkdir ~/.secrets
cat <<EOF > ~/.secrets/cloudflare.ini
dns_cloudflare_api_token = **your_key**
EOF

chmod 0700 ~/.secrets/
chmod 0400 ~/.secrets/cloudflare.ini
Generate the Certificate
certbot certonly \
  --config-dir ~/.secrets/ \
  --work-dir ~/.secrets/ \
  --logs-dir ~/.secrets/ \
  --dns-cloudflare \
  --dns-cloudflare-credentials ~/.secrets/cloudflare.ini \
  -d local.bramp.net
and voila:
 - Congratulations! Your certificate and chain have been saved at:
   /Users/bramp/.secrets/live/local.bramp.net/fullchain.pem
   Your key file has been saved at:
   /Users/bramp/.secrets/live/local.bramp.net/privkey.pem
The privkey.pem is important to keep secret. Normally certbot runs as root, but here we run it as your user for convenience.
If you want this to automatically renew, just run to add a renewal that occurs twice daily at a random minute after 12pm and 12am.
# List your current crontab, and append certbot renewal

(crontab -l ; echo "$(( RANDOM % 60 )) 0,12 * * * $(which certbot) renew -q --config-dir ~/.secrets/ --work-dir ~/.secrets/ --logs-dir ~/.secrets/") | crontab -
Or you can renew (all certificates) on demand with a simple:
certbot renew \
  --config-dir ~/.secrets/ \
  --work-dir ~/.secrets/ \
  --logs-dir ~/.secrets/
Install a simple HTTPS web server
I use http-server, “a simple, zero-configuration command-line http server.”. It supports many useful features, including SSL.
brew install http-server
Running the HTTPS web server
http-server -S \
  -C ~/.secrets/live/local.bramp.net/fullchain.pem \
  -K ~/.secrets/live/local.bramp.net/privkey.pem
You may wish to alias this to something shorter, for example:
alias https="http-server -S \
  -C ~/.secrets/live/local.bramp.net/fullchain.pem \
  -K ~/.secrets/live/local.bramp.net/privkey.pem"
Now you can run https from any directory and it’ll be served over SSL.